Creating aliases using SimpleLogin.
As a Proton Mail user, I gained access to SimpleLogin as part of my Proton Mail subscription. Prior to using SimpleLogin, I utilized the wildcard functionality to create aliases for different requirements. Most frequently, I utilized a new address for each company that required an email address. This worked great until it was necessary to reply to the alias that was created. If a reply was required, I would need to create an address in proton mail settings. While easy to create, this address would then count against the total count allowed by your subscription plan. While addresses could be disabled or enabled as needed, it was not the easiest workflow. After setting up SimpleLogin, I had a question. What if you wanted to send an email to a company you have not communicated with previously? Outlined below is my workflow for setting up an alias in Simplelogin. In hindsight, it seems straight forward, but I found it a little hazy in the beginning when utilizing SimpleLogin.
Goal: Send an email to companyABC using an alias that doesn’t yet exist. In this example, we will setup SimpleLogin to send an email to info@companyabc.com from the alias companyABC@412linux.io.
Step 1: Decide on alias for your domain
This will be the address the receiver will utilize to reply to your message. In this example, the address will be companyabc@412linux.io.
Step 2: Create alias in Simplelogin
In the SimpleLogin UI, select the New Custom Alias button. Enter the alias name to be utilized in the alias prefix box. Ensure the correct domain is selected. If necessary, change the mailbox(es) that will have permission to utilize the alias.

Step 3: Add contact for destination
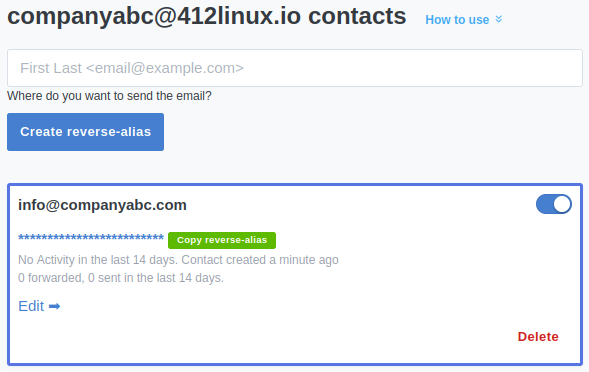
Once the alias for companyabc has been created, a contact will be required. Select the Contacts button on the newly created alias. In the contact box, enter the destination email address. In this example, it will be info@companyabc.com. Once the destination information has been entered, select Create reverse-alias. SimpleLogin will then create the reverse-alias that will be utilized in your email program. Save the reverse alias that was just created as it will used in the next step.

Step 4: Send email
Once the reverse alias is setup, use your email application to send the email. The email creation process will be the same except the destination address. The destination address for the email will be the reverse alias that was setup in step 3. Using Email magic, Email sent to this reverse alias will go to info@companyabc.com from companyabc@412linux.io.
Resources
